Columbus in Hickman County, Kentucky — The American South (East South Central)
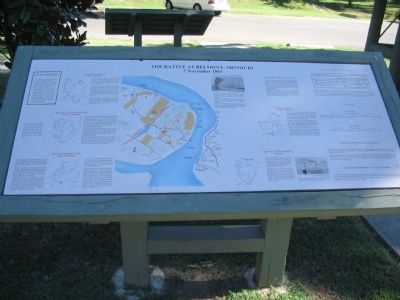
The Battle at Belmont, Missouri
7 November 1861
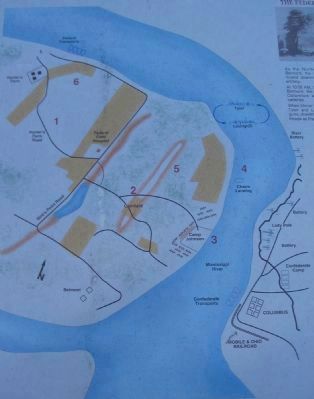
The following maps and text illustrate the battle at Belmont, Missouri. The battle is broken into sections that explain the components of the overall battle. To understand the progression of the battle, match the number above each section to the number on the large central map. This will help you understand where the individual actions occurred and how each section relates to the overall battle.
1 Federal Approach 8:30 to 10:30 AM
Union General Ulysses S. Grant and his troops landed on the Missouri shore around 7:00 AM. They advanced down Hunter's Farm Road to Bird's Point Road, moving south toward Belmont.
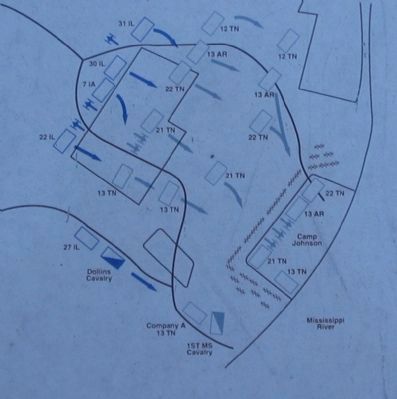
2 Battle at the Cornfield 10:30 to 12:00 PM
The Federal troops advanced through dense woods to a low ridge, just in front of the Confederate line of battle. The Federals fired into the exposed Confederate line. The Southerners fired back, but could not hit the Union troops hidden in the dense woods.
The Confederate defense line was in trouble. By 11:00 they were low on ammunition. Pillow ordered a bayonet charge for the whole line which confused the Federal soldiers, driving them further into the woods. The Federal soldiers regrouped, and fired "a tremendous volley of musketry." This drove the Confederates out of the woods and back to their original line of battle.
The Federal troops moved forward, but each time were driven back. This, however, caused the Confederates to run out of ammunition. Fresh supplies were brought forward , but they were the wrong size and type.
The 12th Tennessee was the first to retreat followed by the 13th Arkansas, then the rest of the line. Confederate troops found safety behind the abatis surrounding Camp Johnson at Belmont. Pillow's original defense line was broken.
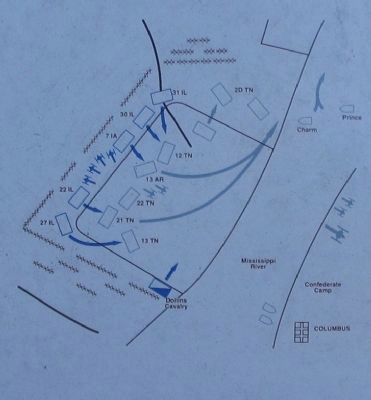
3 Battle for the Camp 12:00 to 2:00 PM
The Union troops surrounded Camp Johnson on its western and southern borders. Columbus artillery fired on the Northern troops to stop their advance into the Confederate camp.
Federal artillery counter-fired into Camp Johnson, allowing the Union troops to enter the camp. The Southern troops fired back to protect their last stronghold but the Union attack was too strong. The Confederates' second defense line collapsed.
Confederate soldiers retreated from Camp Johnson, running upriver away from the battle. Union pursuit ran into the 2nd Tennessee, and men from the 13th Arkansas and 12th Tennessee. The Federal troops, supported by their artillery in Camp Johnson, opened fire on the Confederate troops and "casualties dropped to the ground in squads."
After pursuing Confederates upriver, the Union troops returned to Camp Johnson. Firing ceased and a "perfect quiet" came over the camp. The troops celebrated their hard-fought victory.
Soldiers raised the American flag and officers joined in the singing and speechmaking, while others looted the camp or salvaged military property. Grant ordered the camp burned to regain control of his troops. Some unnoticed wounded and sick Confederates were burned in their tents when the camp was set afire. Later, Confederates claimed the Northern troops murdered Southern soldiers in their tents.
The Federal Gunboats
As the Northern troops marched towards Belmont, the USS Tyler and USS Lexington moved downriver and fired on the Columbus artillery.
At 10:00 AM, hearing rifle and artillery fire from Belmont, the gunboats again moved towards Columbus and engaged the Confederate batteries.
When Union troops entered Camp Johnson, the Tyler and Lexington engaged the Columbus guns, diverting artillery fire away from the Union troops as they entered the camp.
4 Confederate Reinforcements
Confederate reinforcements on the steamer Charm tried to land upriver from Camp Johnson. Confederate soldiers retreating from the camp, rushed the Charm yelling, "Don't land! We are whipped! Go back!"
The Charm moved further up the river and landed her troops by the cornfield. The 11th Louisiana and the 15th Tennessee marched through the woods, moving south toward Belmont.
More reinforcements, with Confederate Brigadier General Frank Cheatham, landed next to the Charm. Cheatham organized soldiers from the 13th Arkansas and the 13th, 2nd, 21st, and 22nd Tennessee units. All the soldiers were given plenty of fresh ammunition. They also moved south toward Belmont.
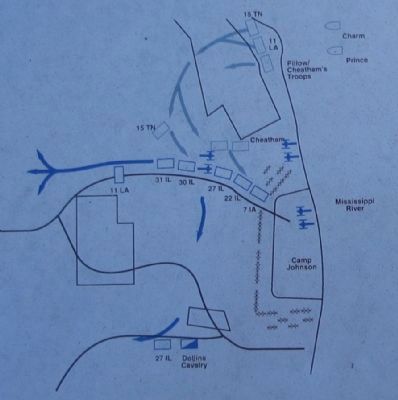
5 Federal Retreat 2:00 to 5:00 PM
Grant observed the arrival of the Confederate reinforcements. He reorganized his troops into a loosely formed column and began marching to the transports about 2:00. The column was broken, with men moving out in all directions. The Federal retreat came too late.
Suddenly, Cheatham's troops attacked the 7th Iowa and 22nd Illinois at the rear of the column. Both sides exchanged fire, but the Federals lost ground fast. Southern troops surrounded the 7th Iowa and many were taken prisoner.
Federal forces at the front of their column ran into the 11th Louisiana and the 15th Tennessee. Federal artillery fired and blew an opening in the Confederate line. The 31st Illinois broke through first, followed by the rest of the column. The column moved quickly towards their transports.
6 Battle at the Landing 5:30 PM
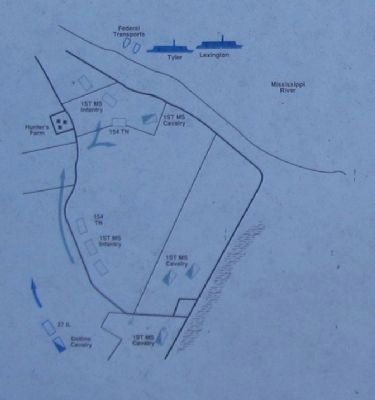
More Confederate reinforcements, under Polk, arrived from Columbus. The 1st Mississippi and the 154th Senior Tennessee Infantry landed at Belmont at 3:00 and moved northwest toward the Federal troops' landing site.
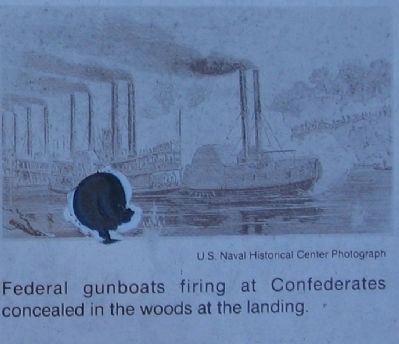
At the landing, the Confederates opened fire on the Federals as they boarded their transports. Once all the transports were moving, the Federal gunboats fired at the Confederates on the bank. Grant's transports cleared the coast and steamed upriver toward Cairo, Illinois.
Who Won the Battle at Belmont?
"The victory was complete... such courage will insure victory wherever our flag may be borne and protected by such a class of men."
Brigadier General Ulysses S. Grant, 1861
"My first acknowledgment for this...triumph of our arms and the defeat of our enemies are due to the favoring providence of Almighty God. ... and by which the hearts of our troops were made strong in the day of battle... And He has given us a victory."
Major General Leonidas Polk, 1861
Though North and South both claimed a victory for the battle at Belmont, it was not a clear victory for either side. The battle did not have any military significance, but it was important for several reasons. Belmont was Grant's first major battle and marked the beginning of his Civil War career. The battle also initiated the opening of the Federal campaign to win the Mississippi River. After the battle, Grant's and Polk's armies contained battled-tried soldiers - raw, volunteer recruits became veterans in a day.
Casualties
Grant's Troops
Wounded: 306 Captured/Missing: 205 Killed: 95
The 7th Iowa suffered the most with 31 killed, 77 wounded and 114 missing. Of those reported missing many were Confederate prisoners to the end of the war.
Polk's Troops
Wounded: 419 Captured/Missing: 117 Killed: 105
The 13th Tennessee lost the most men with 28 killed, 75 wounded and 46 men missing.
Prisoner and Wounded Exchange
After the battle, Confederate and Federal officers often met on steamers under the flag of truce. Their initial meeting discussed the exchange of prisoners. By mid-November, a total of 238 prisoners were exchanged on both sides.
Social calls began after the exchange. Polk and Colonel Nathan Buford of the 27th Illinois were friends and met many times while both were stationed in Kentucky. Grant had never met Polk before the battle, but both were graduates of West Point. At their meetings, they discussed horses and the conduct of the war over dinner and champagne.
Confederate Withdrawal of Columbus
In 1862, Grant defeated the Confederates at Forts Donelson and Henry. This left Columbus unprotected and vulnerable to Federal attack. On March 2, Polk and his staff left Columbus after destroying buildings and supplies. The next day, Federal forces rode into the Confederate fortress without firing a shot. Columbus remained in Northern hands to the end of the war.
Topics. This historical marker is listed in this topic list: War, US Civil. A significant historical month for this entry is March 1659.
Location. 36° 45.937′ N, 89° 6.638′ W. Marker is in Columbus, Kentucky, in Hickman County. Located in the parking lot for Columbus-Belmont State Park. Touch for map. Marker is in this post office area: Columbus KY 42032, United States of America. Touch for directions.
Other nearby markers. At least 8 other markers are within walking distance of this marker. The History of Columbus, Kentucky (here, next to this marker); "Gibraltar of the West" (within shouting distance of this marker); Confederate Trenches (about 300 feet away, measured in a direct line); Anchor and Chain (about 400 feet away); A River View of History (about 400 feet away); Columbus - A Town Transformed (about 400 feet away); Polk's Firepower (about 400 feet away); In Search Of .... (about 500 feet away). Touch for a list and map of all markers in Columbus.
Related markers. Click here for a list of markers that are related to this marker. Columbus-Belmont State Park markers along with a marker at Belmont, Missouri
Also see . . . Battle of Belmont. Wikipedia article on the battle. (Submitted on October 19, 2010, by Craig Swain of Leesburg, Virginia.)
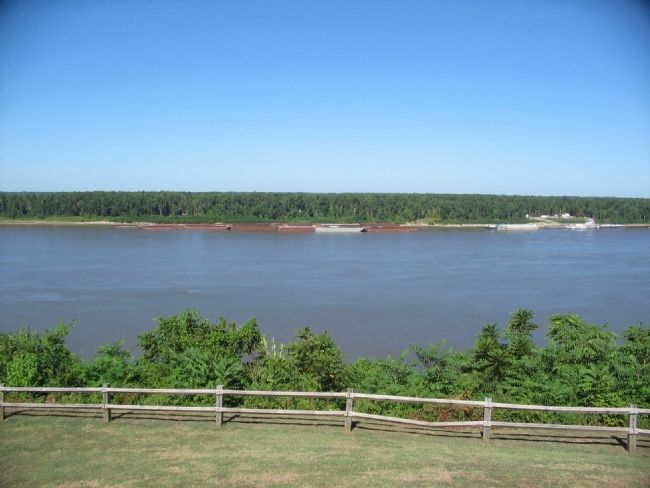
Photographed By Craig Swain, September 4, 2010
10. Belmont Landing
Looking from the bluffs at Columbus, where the Confederate fortifications stood, towards Belmont Landing on the Missouri shore of the river. At the time of the battle, Camp Johnson stood in an open area near the river bank. Around the camp were felled trees formed as abatis.
Credits. This page was last revised on June 16, 2016. It was originally submitted on October 19, 2010, by Craig Swain of Leesburg, Virginia. This page has been viewed 2,892 times since then and 56 times this year. Photos: 1, 2, 3, 4, 5, 6, 7, 8, 9, 10. submitted on October 19, 2010, by Craig Swain of Leesburg, Virginia.
